Jul 29, 2012

Closet Doors


Why do I get so damn obsessed with the dumbest things?
Today, I was painting the kids toyroom when I shockingly noticed I over looked one thing.... the closet door knob.  Such a juicy detail that I can go bananas with.  So then, I became obsessed.
I've been online all friggin' day looking for the perfect door knobs.  I found some wicked stuff...

Real Wood

Myterra Gemstone Hardware

Graham and Green
Myterra Gemstone Hardware

Graham and Green
Etsy.com
   
Ebay
They light up when you touch them!!!

Source  
Historic Home Hardware
It's a bunny! Check out all the other animals.  Awesome.  Martin Pierce
Source
EBay
Just wrong!

My Favourite by far is the Amethyst knob.  But they come with a hefty price tag, and really, aren't that practical.  And, I am loving the wood ones because I would deck those out in a custom paint job.  I'll have to decide on something!!

Photobucket

Jul 26, 2012

1955 Kerns Rd.

I finally got my new house numbers up. And, I love them.  I knocked the old ones off from above the garage in like 2 seconds.  They were pretty nasty.  Some dinky plastic things and there was spider nests behind them.  Yuck.  I sanded down the wood and then painted over the section where they were.

It's like they never existed.

Then I drilled in my new ones.


Weird what a difference new house numbers can make.

Hopefully this weekend, Ryan will get up our new light fixture.  It's been 2 weeks.  My max is 4, then I hire someone.

I really wanted the iron house numbers from Restoration Hardware.  They weren't too pricey, but I thought I'd double check EBay first.  And what do ya know, I got my beauty numbers for half the price, and they are way nicer than RH.  ALWAYS, check ebay before you buy anything!!!

Still got a lot of work to do outside.  I've ordered my new door, but it'll be 8 weeks before it gets here.  I'm going to do a post about local door shopping soon.  I also have a solid plan for my exterior.  Can you believe I finally have a plan!  I had a little designer help, but I am confident that it's going to look amazing.  I just need a wee bit of cash to get 'er all done...haha...just a wee bit.  wink wink honey.


Photobucket

Jul 21, 2012

Next Project...

I may not be blogging for a bit since my next project is a big one!  The first room that I have decided to tackle is the kid's playroom.

Before we moved in....
Now that we've moved in... (and this is clean!)


The toy room was actually last on my list of rooms to decorate, but I came across this inspiration picture on Houzz.com, and fell in love.  The kids and I took a trip to HomeDepot (the Orange Store as James call it), and bough a few gallons of paint.


Stay tuned.  This may take me a week or so to get done.  I have to paint all the trim and the ceiling and have a few pieces of furniture that need a coat of paint before they make it in the room.  But first, I need to clean up all the toys...not fun!

Can't wait to see how it all turns out!

Photobucket

Jul 20, 2012

My Fireplace Was Bugging Me.

First of all, just want to remind you to sign up for my email updates... over there, to the right...

Anyway, I woke up this morning and for some reason, my fireplace was irritating me.   So I gave it a mini make over.

Some before pics.  That brass - my, oh, my.


I removed the Brass pieces and brought them to the garage.  I gave them a light sand.  I was hesitant to sand the brass because it scratched easily, and i could reeeeally see the scratches, but I was more worried that the paint wouldn't stick because the brass was soooo shiny.  In the end, I am glad I gave them a light buff.  The paint is quite thick so you can't see the scratches at all.  Good call Cait.


I sprayed them with Rust-Oleum's black heat resistant paint.  It only takes about 1/2 hour between coats to dry, so I managed about 5 light coats through out the day.  It didn't need that many coats, but I sprayed really lightly, so to make sure I covered everything, I just kept going.  Besides, the kids thought it was hilarious that I was painting the fireplace.  They love watching!

I was terrified I wouldn't get the damn thing back on, so I took precise mental notes while taking it off. It went back together with ease!  Just a few screws here and there..

Ta Da...


What do ya think?  Looks good eh?!?  Not bad for a $7 dollar makeover!
And you thought I'd paint the stone...silly Sharon.  NEVER!

Update:
Here's a pic of my mantle today (Sept. 2012). I've spruced it up a bit!

 
Linked to:
Home Stories A2Z
Photobucket

Jul 18, 2012

Grandma Hluchy's Great Rice

I think I am subscribed to some 75 different blogs and shopping websites.  Every morning, I wake up and shuffle through my emails to see if anything interesting catches my eye.  Today, I see in the subject line "Grandma Hluchy's Great Rice"... Cha Ching...Jackpot.

A slovak recipe from Grandma Hluchy's kitchen beats any home decor update any day!  THANK YOU AUNTIE VIOLET.  I'll be attempting this recipe tomorrow for dinner.

Thought I'd share..


Grandma Lookey’s Rice

March 1982 revisited June 18, 2012

Fry Onions and Oil, when onions are translucent add a bit of butter

Wash & Drain 1 cup of rice

Fry for 5 minutes – add Salt & Pepper, nutmeg and ginger (Nice
little pinches)

Boil 2 cups of water

Add water to rice – cover, turn off element, and let it sit for ½ hour
(or til rice is done)

You can add a chicken boullion to the boiling water for more
flavour

When rice is done, fluff it up and add parsley flakes, fresh or dried
for a nice look and
taste.


Photobucket

Jul 17, 2012

Ugly Valance No More!

I really wanted to update the window treatments in my kitchen, but for fairly cheap.  I'd love some roman blinds, but I know that I'll be bored of them quick.  And, even if I'm not, when I reno my kitchen in the future, I'll want to fork out the dough for something really nice.  Not going to waste my money on something that is temporary.

Valances seemed to be a fair solution.  The rod was already up, and I didn't need to blow my budget on a ton of fabric.  Valances tend to look dated and cheap quickly, so I wanted something that had a custom look.

I searched through my fabric box an found these old brown curtain panels I had from our Jarvis house.  I saved them because I liked the texture of the fabric.  Here's how I made 2 old curtain panels into 4 custom looking valances.

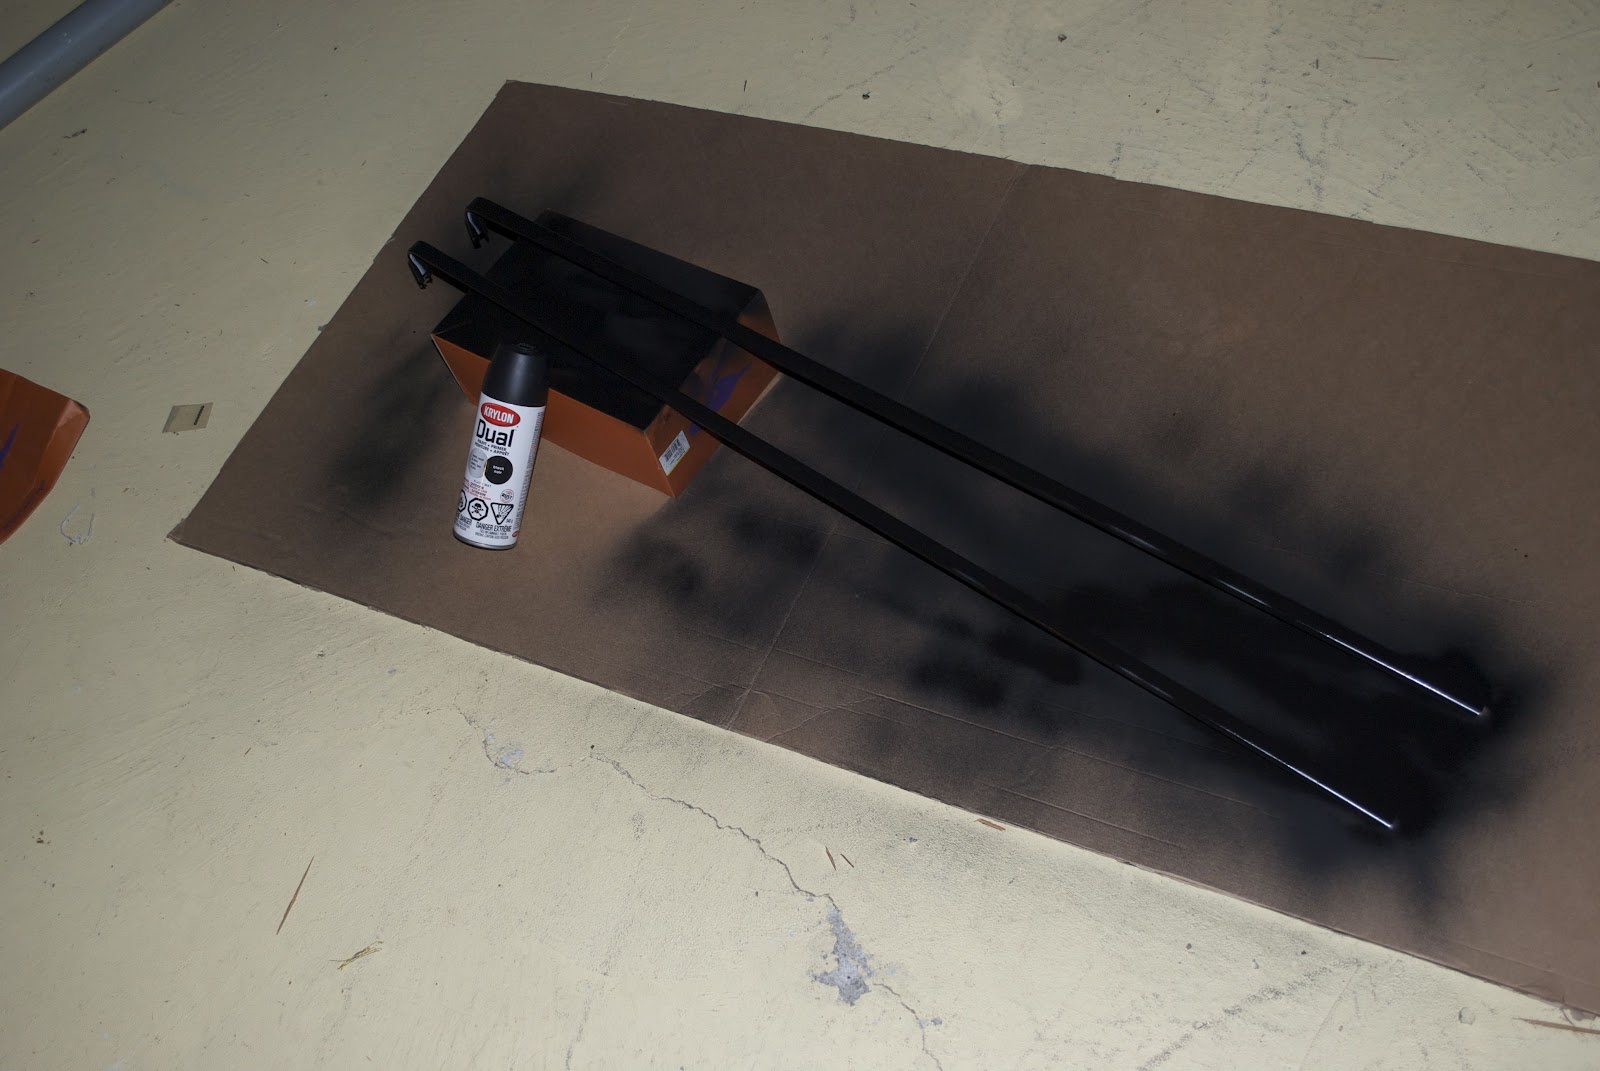
First, I sprayed the valance rod black.


Then I cut a strip of fabric from my banquette and pressed it nice and even.


I cut the tabs off the curtain panel and cut the panel in half.  Next, I cut my 2 panels to 16" long, which is the basic length of a valance.  


I went bananas pinning my strip to the bottom of my valance to make sure I sewed it straight.


I could have just left the valance like that, but I decided to add some grommets.  I think that grommets made the valances a little more modern.  

Grommets are so easy to add.  Just mark your holes, cut your holes and snap the grommets in place.  

Most important, add an even amount of grommets (6, 8, 10 etc...) so both your ends are facing in.  Also make sure not to leave too much space between each grommet.  Once hung, your fabric between each hole will stick out too far if you leave too much space.. Yea, I made both those mistakes!!!  whoops.


Voila...here they are.  I actually like how they turned out.


Photobucket

Jul 16, 2012

Exterior decisions


If you've talked to me in the last 2 weeks, you know how much the exterior of my house is irritating me.  Seriously, I can live with someone else's appliances, and even a yellow ceramic tiled shower.... But I can't stand having an ugly exterior.  I want a new door.  I want new shutters.  I want new garage doors.  And, I want to paint my brick.  I don't care what anyone thinks!!!!  I want to paint my stupid brick.

Here's my house when we first moved in.


I want raised panelled shutters...not louvered in a deep taupe colour, or black.


Garage doors will be Coach style.  I'd like black handles. The colour will be a sandstone - the same colour as the window casings.


I picked out a new front door.  A black executive style door, with a 3/4 lite, antique bubble glass and an interior black iron grid.  Make sense??  Here's kinda a picture...


I wanted black, but Ryan wants red.  A red door?  That throws off my whole plan.  But, I thought he may have a point.  So, I found some old red exterior paint I had from the farm and went to town painting the existing door red just to see if I'd like it.  It takes 8 weeks to get my new door, so why not?!?!


 F-words - I hate it when he's right.  I like it red!!!
I took off the storm door and now I think the red door looks great.  I'm back to square one.

As of now

  • I removed the storm doors
  • I'm ordering the new front door in red.  
  • I bought some new, gorgeous Murray Fiess light fixtures that Ryan is installing (one above the portico and one between the garage doors)
  • I painted that ugly piece of brown above the garage doors.  
  • I also ordered some new house numbers that'll go on the portico.  
  • And, you can't see, but I painted my mailbox black.
Now that my door is going to be red, I have to come up with a new plan.  I'm putting off the new shutters and garage doors until the spring when I am ready to paint the brick.  We're getting a new roof in the spring so that'll make a huge difference.

I'm having a hard time committing to anything in this house!  Hope that's a sign this house is "the one".


A small before & after!

Photobucket